A Product by Invincible Technology

A Product by Invincible Technology

The i-Care User Instructions provide general instructions for setting up, operating the i-Care HC 1.0.

The Packing List of i-Care include Robot Device Base, Tablet, Power Adapter, and an Emergency Button.

i. Robot Device Base comprises of Speaker, Home Button, Responding Light, Connection Cable, Jack, and a Power Connector
ii. Tablet is equipped with Camera, Volume Button, Lock Button, and a Touch Panel
i. Placed the Tablet at the Robot Device Base. A “click” sound can be heard after the Tablet is securely docked.
ii. Insert the Connection Cable into the Jack which is located at the back of the Tablet.
iii. Insert the Power Adapter Cable into the Power Connector which can be found in the Robot Device Base.
iv. Switch on the Power Adapter Switch
v. Responding Light will blink, and Logo can be seen

i. At the Home Screen, “Network Connection is not connected” can be seen at the top of the screen. Click on the “Set-Up Wi-Fi” which will lead to Wi-Fi Settings.

i.i. In the Wi-Fi Settings, turn on Wi-Fi and select the corresponding Wi-Fi Network, enter the password to connect to Wi-Fi. Once Wi-Fi is connected successfully, the upper right corner of the tablet will display a Wi-Fi Icon to indicate that Wi-Fi Connection is established
i. Emergency Button
An Emergency Button is used as a safety measure to alert loved ones and healthcare professionals in case of an emergency.
ii. Video Conference Call
A video conference call allows participants to see, hear and talk to each other in real-time.
iii. Surveillance
Acts as a surveillance camera that allows the healthcare professionals and families to observe the user’s status.
iv. Entertainment
Entertainment applications are pre-installed on i-Care which allow users to play games and watch video.
v. File Sharing
File Sharing provide access or share of files, images, and videos with friends and families.

Home Screen includes Applications such as Weather, My Friend List, TV, Personal Center, Treasure Box and Photo Gallery.

Click on the upper part of the “Weather” to display Calendar and click on the lower part of the “Weather” to display Weather Forecast of the Selected Country.
Displays all the contact person that is added.

Includes Built-In TV Channels which can be streamed online without downloading.
Settings of the i-Care which include changing of Avatar’s Icon, Name, Setting Up “One-Click” for Assistance, etc.

Built-In Applications such as video games, music box, video application which allow users to explore with.
To view pictures, stored and received picture from friends and families.
A list of contacts which allow user to connect and call them by clicking on their avatar.

i. Download Mobile Application to your mobile from Google Play and Apple Store
ii. Once the account is successfully registered, click on the “+” icon and click on the “Scan QR code”
iii. Aim the Camera at the Robot QR Code which can be found in “Setting”
iv. Once the Robot QR Code is scanned, a notification will notify the user that the mobile had detected the Robot QR Code and request to be added into the contact list, click on “Allow”

i. Click the lower right icon of my Friend List interface
ii. A Pop-Up Box will be displayed, enter the corresponding phone number/Email in the Pop-Up Box. OR.
iii. Enter the corresponding i-Care Device Number which can be found at the bottom of the Robot Device Base (E.g., 12345)
iv. Once all the details are keyed in, click the confirm button.
i. Press the Avatar to call the Relatives / Friends via Video Conferencing
ii. To enter Electronic Clock Standby Mode or Emoticon Animation Standby Mode, click the upper right corner of the “My Friends List” and it will display the Default Standby Mode which is the Digital Clock.

iii. Under Contact Management in the Personal Center, click on the “History” Button to view Historical Communication Records.

iv. Under Contact Management in the Personal Center, click on the “Connect” Button to set Automatic or Manual Connection Mode.
To initiate a video call, touch the Contact Avatar in My Friend List and a call request will be delivered to the corresponding person.

Once user received a message, Message Notification will be prompt in the screen. User can either acknowledge the message by pressing the “Cancel” button or send a Voice Message by pressing “Reply”.
Before calling in / out to the device, Family Members / Users will need to download and install the i-Care Mobile Application. Please go to Download App | i-Care (i-care-hc.com) for download of both Android and IOS mobile App.
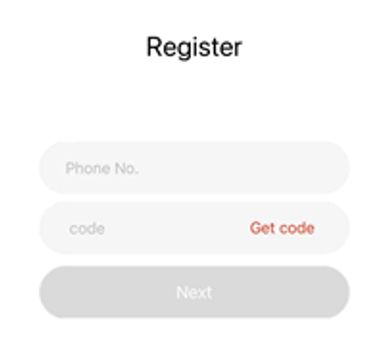
Once installation is successful, open the i-Care Application on the Mobile Device. New user will need to register using their mobile number to get the verification code after the registration is completed.
Note: The current version of i-Care only support registration using local Singapore mobile number, please use email to register if you don’t have a local Singapore mobile number

i. In the Mobile Interface, there are 2 functions that can be seen under the main interface, “Me” and “Contact”.

ii. Click the “+” in the upper right corner to add device / user by scanning the QR Code of the “Personal Center” Interface on the i-Care Device or entering the i-Care Device Number

Click on the “Contact” in the mobile application and select the corresponding device to view historical call records, initiate video calls, messages, and silent calls.

i. To Modify Nickname, Perform Remote Settings, View Action History and Delete User can be found in the upper right contact interface

ii. Click on the “Remote Settings” to modify the ringing time of the called party and set up the “Do not Disturb” Mode.

iii. Click on the “Action History” to view the Action History of the user using i-Care at home.

To initiate a Video Call, select the corresponding i-Care device and click on the “Video Conference” button.

To send a Message to i-Care, click on the “Send a Message” Button and a Sending Method Selection Display will be prompt, either send via a Text or Voice Message.

To send an Image to i-Care, click on the “Send Photos” Button and a Photo Source Selection Display will be prompted, select picture from photo album
i-Care’s Personal Setting which allows the user to personalize their i-Care device to their preference.

To check the connectivity of the Wi-Fi. Users need to choose the corresponding Wi-Fi to make a call with their family’s members.
To adjust the volume of the i-Care device, slide the adjustment lever from left to right to increase or decrease the volume of the device. Alternatively, user can use the volume button which is located at the left-hand side of the device to adjust the volume.
To adjust the brightness of the i-Care device, slide the adjustment lever from left to right to adjust the brightness of the screen.

The Emergency Button is a Wireless Safety Accessory used by the user to ask for help in emergency. During an emergency situation, the user can press the Wireless Emergency Button for 3 seconds to initiate an emergency video call to a predefined Emergency Contact Person, an emergency text message will also be sent to notify the contact.
To connect Emergency Button with i-Care:
i. Select “Personal Centre” and choose “Emergency Contact Person”

ii. Select “Add Wireless Button”
iii. Press and hold the emergency button until the Red Light lighted up

iv. Press and hold the emergency button again until the i-Care shown, “Connected”
User can select their emergency contact person by:
i. Select “Personal Setting” and choose “One Click for Assistance”
ii. It will show the list of contact
iii. Select the contact to make it as the Emergency Contact Person

To initiate an emergency call, user just need to press and hold the emergency button for 3 seconds. i-Care will start the emergency call and an Email or SMS message will be sent to the Emergency contact person according to the registration detail provided.
Add the Wireless Security Accessories (Wireless Buttons and Infrared Detectors), only applicable if an infrared sensor is equipped
Under Contact Management in the Personal Center, click on the “Connect” Button to set Automatic or Manual Connection Mode. When Automatic is set, call will be automatically picked up by i-Care device
Select which period to set the Do not Disturb Mode.
Set the screen saver type: Default is Clock Screen Saver, other is Animated Screen Saver.
Includes more details settings on video quality, emergency call and Factory Reset.

Displays the built-in product purchase, FAQ, Function Introduction, Version Update, etc.

Any comments and suggestion to feedback the i-Care Device can be written in the feedback section.